PXE Windows PE under UEFI and Secure Boot Enabled

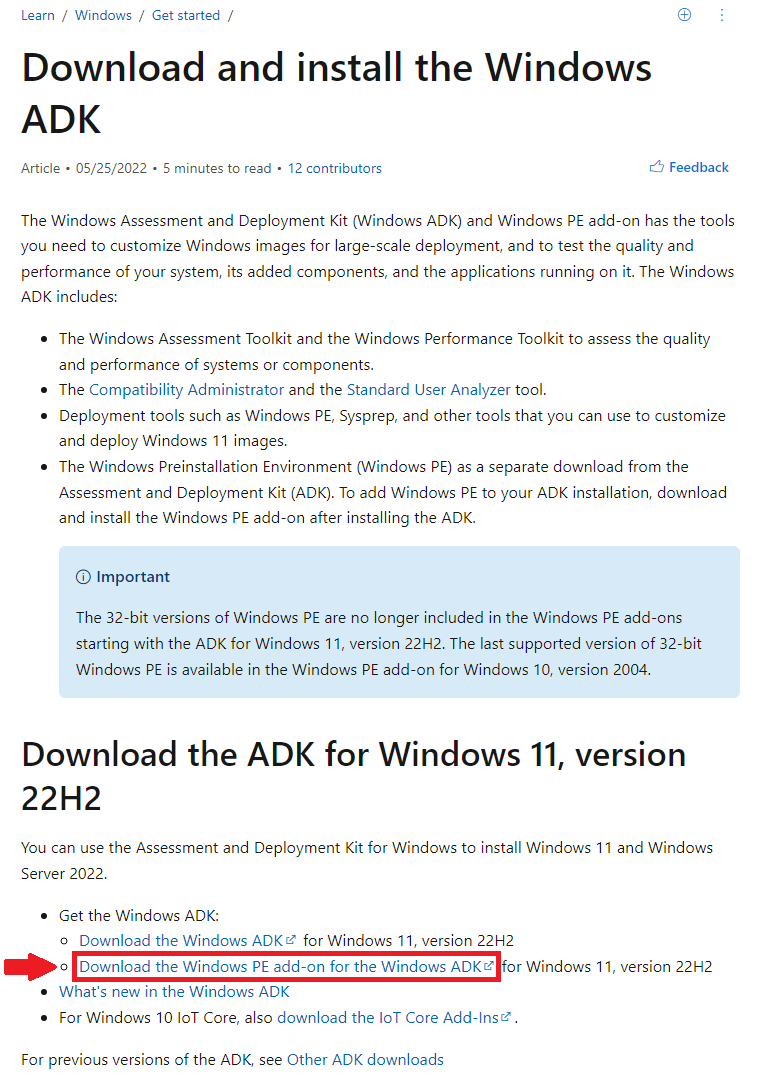
1. Download Windows PE add-on for the Windows ADK for Windows 11, version 22H2 and install.

In this example, Windows ADK Folder (default, C:\Program Files (x86)\Windows Kits\10\Assessment and Deployment Kit\Windows Preinstallation Environment) is %PEFOLDER% and the TFTP Server Root is %TFTPROOT%

2. Patch BCD in %PEFOLDER%\amd64\Media\EFI\Microsoft\Boot\

  • Change the path of Boot Manager to our file, \bootx64.efi
    > bcdedit /store BCD /set {bootmgr} path \bootx64.efi
  • Disable Integritycheck and Change Bootmenupolicy to Legacy
    > bcdedit /store BCD /set {bootmgr} nointegritychecks Yes
    > bcdedit /store BCD /set {default} bootmenupolicy Legacy
  • Since linux file system treats file and directory names as case-sensitive, ramdisksdipath need to be modified in case that PXE is served on linux server
    > bcdedit /store BCD /set {7619dcc8-fafe-11d9-b411-000476eba25f} ramdisksdipath \Boot\boot.sdi
  • Entries of patched BCD should be identical to:
    > bcdedit /store BCD /enum all
    
    Windows Boot Manager
    --------------------
    identifier              {bootmgr}
    path                    \bootx64.efi
    description             Windows Boot Manager
    locale                  en-US
    inherit                 {globalsettings}
    nointegritychecks       Yes
    flightsigning           Yes
    default                 {default}
    displayorder            {default}
    toolsdisplayorder       {memdiag}
    timeout                 30
    
    Windows Boot Loader
    -------------------
    identifier              {default}
    device                  ramdisk=[boot]\sources\boot.wim,{7619dcc8-fafe-11d9-b411-000476eba25f}
    path                    \windows\system32\boot\winload.efi
    description             Windows Setup
    locale                  en-US
    inherit                 {bootloadersettings}
    isolatedcontext         Yes
    osdevice                ramdisk=[boot]\sources\boot.wim,{7619dcc8-fafe-11d9-b411-000476eba25f}
    systemroot              \windows
    bootmenupolicy          Legacy
    detecthal               Yes
    winpe                   Yes
    ems                     No
    
    Windows Memory Tester
    ---------------------
    identifier              {memdiag}
    device                  boot
    path                    \efi\microsoft\boot\memtest.efi
    description             Windows Memory Diagnostic
    locale                  en-US
    inherit                 {globalsettings}
    
    EMS Settings
    ------------
    identifier              {emssettings}
    bootems                 No
    
    Debugger Settings
    -----------------
    identifier              {dbgsettings}
    debugtype               Serial
    debugport               1
    baudrate                115200
    
    Global Settings
    ---------------
    identifier              {globalsettings}
    inherit                 {dbgsettings}
                            {emssettings}
    
    Boot Loader Settings
    --------------------
    identifier              {bootloadersettings}
    inherit                 {globalsettings}
                            {hypervisorsettings}
    
    Hypervisor Settings
    -------------------
    identifier              {hypervisorsettings}
    description             Hypervisor Settings
    hypervisordebugtype     Serial
    hypervisordebugport     1
    hypervisorbaudrate      115200
    
    Device options
    --------------
    identifier              {7619dcc8-fafe-11d9-b411-000476eba25f}
    ramdisksdidevice        boot
    ramdisksdipath          \Boot\boot.sdi
    

3. Upload required files to TFTP server (For linux servers, capitalization DOES matter)

  • %PEFOLDER%\amd64\Media\EFI\Boot\bootx64.efi to %TFTPROOT%\bootx64.efi
  • %PEFOLDER%\amd64\Media\Boot\boot.sdi to %TFTPROOT%\Boot\boot.sdi
  • %PEFOLDER%\amd64\en-us\winpe.wim to %TFTPROOT%\sources\boot.wim
    Or customized windows 11 based .wim file can be used, depending on the purposes
  • patched BCD to %TFTPROOT%\Boot\BCD


PXE would fail if TFTP directory and file structures are not properly set (e.g. capitalization mismatch on linux server)

4. Verify with hyper V

Remote Desktop Shadow Session with Saved Credentials

Remote Desktop Shadow Mode allows administrators to remotely view and/or interact with the user’s desktop.

To connect shadow session, /prompt option is needed because mstsc.exe tries to connect to client with the current user credential.

However, with /prompt option, mstsc.exe always requests a user credential to connect and it cannot be bypassed with saved one.

CredentialUIBroker

This credential window is not a standard WIN32 window but a XAML UI, thus it can be manipulated via UI Automation.

AutomationId and ClassName of Fields

Slow Down Host Network with Hyper-V External Network Switch

Problem:
If external virtual switch is created on Virtual Switch Manager, network performance of host network is significantly decreased. Internal virtual switch is not affected.

Solutions:
1. Using ICS of host network
https://www.technig.com/connect-hyper-v-machines-to-internet/

2. Using RRAS for NAT configuration
https://www.dell.com/support/kbdoc/en-us/000118763/configuring-windows-server-2012-r2-as-a-router

3. Disabling VMQ and/or RSC
https://www.dell.com/support/kbdoc/en-us/000145221/windows-server-slow-network-performance-on-hyper-v-virtual-machines-with-virtual-machine-queue-vmq-enabled
https://docs.microsoft.com/en-us/windows-server/networking/technologies/hpn/rsc-in-the-vswitch

For VMQ:> Set-VMNetworkAdapter –ManagementOS -Name -VmqWeight 0
For RSC:> Set-VMSwitch -Name vSwitchName -EnableSoftwareRsc $false

4. Using NAT via Powershell
https://petri.com/using-nat-virtual-switch-hyper-v
https://docs.microsoft.com/en-us/virtualization/hyper-v-on-windows/user-guide/setup-nat-network

New-VMSwitch -SwitchName “NATSwitch” -SwitchType Internal
New-NetIPAddress -IPAddress 192.168.0.1 -PrefixLength 24 -InterfaceAlias “vEthernet (NATSwitch)”
New-NetNAT -Name “NATNetwork” -InternalIPInterfaceAddressPrefix 192.168.0.0/24

Manage Firewall with netsh cmd

D:\>netsh advfirewall firewall show rule name=all | find "Desktop"
Rule Name:                            Remote Desktop - Shadow (TCP-In)
Grouping:                             Remote Desktop
Rule Name:                            Remote Desktop - User Mode (UDP-In)
Grouping:                             Remote Desktop
Rule Name:                            Remote Desktop - User Mode (TCP-In)
Grouping:                             Remote Desktop
D:\>netsh advfirewall firewall show rule name="Remote Desktop - User Mode (UDP-In)"
Rule Name:                            Remote Desktop - User Mode (UDP-In)
----------------------------------------------------------------------
Enabled:                              Yes
Direction:                            In
Profiles:                             Domain,Private,Public
Grouping:                             Remote Desktop
LocalIP:                              Any
RemoteIP:                             Any
Protocol:                             UDP
LocalPort:                            3389
RemotePort:                           Any
Edge traversal:                       No
Action:                               Allow
Ok.
D:\>netsh advfirewall firewall set rule name="Remote Desktop - User Mode (UDP-In)" new LocalPort=3388

How to change Hotspot IP of armbian

e.g. To change ip range of access point to 10.9.1.x/24

1. edit /etc/network/interface.d/armbian.ap.nat

address 10.9.1.1
netmask 255.255.255.0
network 10.9.1.0
broadcast 10.9.1.255

2. edit /etc/dnsmasq.conf

listen-address=10.9.1.1
dhcp-range=10.9.1.50,10.9.1.150,12h

How to forward hostapd (access point) traffics to VPN

/usr/sbin/ip route add default dev [dev.vpn] table [tbl.no]
/usr/sbin/ip rule add iif [dev.ap] table [tbl.no]

[dev.vpn] is a vpn device name. (e.g. tun0)
[dev.ap] is an access point (wlan) device name. (e.g. wlan0)
[tbl.no] is a desired table number which is not reserved, and can be replaced by string name if you add one in /etc/iproute2/rt_tables

to disable VPN forwarding,

/usr/sbin/ip route flush table [tbl.no]

Systemctl enabling of OpenVPN

1. config file is in /etc/openvpn

sudo systemctl start/stop/status/enable/disable openvpn@[config]

2. config file is in /etc/openvpn/client

sudo systemctl start/stop/status/enable/disable openvpn-client@[config]

3. config file is in /etc/openvpn/server

sudo systemctl start/stop/status/enable/disable openvpn-server@[config]

extension of config should be .conf not .ovpn

Turn on/off mobile hotspot on windows 10 via powershell

To turn on mobile hotspot:
PS C:\> [Windows.Networking.NetworkOperators.NetworkOperatorTetheringManager,Windows.Networking.NetworkOperators,ContentType=WindowsRuntime]::CreateFromConnectionProfile([Windows.Networking.Connectivity.NetworkInformation,Windows.Networking.Connectivity,ContentType=WindowsRuntime]::GetInternetConnectionProfile()).StartTetheringAsync()↵


To turn off mobile hotspot:
PS C:\> [Windows.Networking.NetworkOperators.NetworkOperatorTetheringManager,Windows.Networking.NetworkOperators,ContentType=WindowsRuntime]::CreateFromConnectionProfile([Windows.Networking.Connectivity.NetworkInformation,Windows.Networking.Connectivity,ContentType=WindowsRuntime]::GetInternetConnectionProfile()).StopTetheringAsync()↵

NanoPi R2S network configuration (armbian)

# add following line in /etc/sysctl.conf
net.ipv4.ip_forward=1

# Forward all traffic with masquerading ip from lan0 to eth0 (internet share)
/sbin/iptables -t nat -A POSTROUTING -j MASQUERADE

# Forward incoming connection from eth0 or tun0 to lan0 (port forwarding)
/sbin/iptables -t nat -A PREROUTING -i tun0 -p tcp –dport 3389 -j DNAT –to-destination 10.10.0.10:3389
/sbin/iptables -t nat -A PREROUTING -i tun0 -p tcp –dport 22 -j DNAT –to-destination 10.10.0.10:22
/sbin/iptables -t nat -A PREROUTING -i eth0 -p tcp –dport 24800 -j DNAT –to-destination 10.10.0.10:24800

# disabling tx offload on the USB ethernet
# https://forum.armbian.com/topic/10127-ethernet-tx-offload-bug/
/usr/sbin/ethtool -K lan0 tx off

Accessing LANs behind OpenVPN client/server not on gateway

References
1. Expanding the scope of the VPN to include additional machines on either the client or server subnet.
2. Accessing LAN resources when OpenVPN is not LAN’s GW
3. Lans behind OpenVPN
4. NAT-hack

OpenVPN configuration should be set properly before setting routing.

For Windows
1. Ip Forwarding. (equivalant to ‘net.ipv4.ip_forward = 1’ on linux box)
In regedit, HKEY_LOCAL_MACHINE\System\CurrentControlSet\Services\Tcpip\Parameters
Change IpEnableRouter to 1.

PS C:\Windows\system32> Set-ItemProperty HKLM:\System\CurrentControlSet\Services\Tcpip\Parameters -Name IpEnableRouter -Value 1
PS C:\Windows\system32> Get-ItemProperty HKLM:\System\CurrentControlSet\Services\Tcpip\Parameters -Name IpEnableRouter  

IPEnableRouter : 1
PSPath         : Microsoft.PowerShell.Core\Registry::HKEY_LOCAL_MACHINE\System\CurrentControlSet\Services\Tcpip\Parameters
PSParentPath   : Microsoft.PowerShell.Core\Registry::HKEY_LOCAL_MACHINE\System\CurrentControlSet\Services\Tcpip
PSChildName    : Parameters
PSDrive        : HKLM
PSProvider     : Microsoft.PowerShell.Core\Registry


PS C:\Windows\system32>

2. Ip Masquerading. (equivalnt to ‘iptables MASQUERADE’ on linux box)

2-A. Use Powershell cmdlet New-NetNAT.

PS C:\Windows\system32> Get-NetIPAddress | Where-Object {$_.InterfaceAlias -Eq "OpenVPN TAP-Windows6" -And $_.AddressFamily -Eq "IPv4" }


IPAddress         : 10.7.0.20
InterfaceIndex    : 9
InterfaceAlias    : OpenVPN TAP-Windows6
AddressFamily     : IPv4
Type              : Unicast
PrefixLength      : 24
PrefixOrigin      : Dhcp
SuffixOrigin      : Dhcp
AddressState      : Preferred
ValidLifetime     : 364.06:00:02
PreferredLifetime : 364.06:00:02
SkipAsSource      : False
PolicyStore       : ActiveStore


PS C:\Windows\system32> New-NetNAT -Name MYVPNNAT -InternalIPInterfaceAddressPrefix 10.7.0.20/24

2-B. Use Internet Connect Share (ICS)
Edit HKEY_LOCAL_MACHINE\System\CurrentControlSet\Services\SharedAccess\Parameters
Change ScopeAddress and ScopeAddressBackup to OpenVPN ip, then turn on ICS.

PS C:\Windows\system32> Set-ItemProperty HKLM:\System\CurrentControlSet\Services\SharedAccess\Parameters -Name ScopeAddress -Value "10.7.0.20"
PS C:\Windows\system32> Set-ItemProperty HKLM:\System\CurrentControlSet\Services\SharedAccess\Parameters -Name ScopeAddressBackup -Value "10.7.0.20"
PS C:\Windows\system32> Get-ItemProperty HKLM:\System\CurrentControlSet\Services\SharedAccess\Parameters -Name ScopeAddress


ScopeAddress : 10.7.0.20
PSPath       : Microsoft.PowerShell.Core\Registry::HKEY_LOCAL_MACHINE\System\CurrentControlSet\Services\SharedAccess\Parameters
PSParentPath : Microsoft.PowerShell.Core\Registry::HKEY_LOCAL_MACHINE\System\CurrentControlSet\Services\SharedAccess
PSChildName  : Parameters
PSDrive      : HKLM
PSProvider   : Microsoft.PowerShell.Core\Registry


PS C:\Windows\system32> Get-ItemProperty HKLM:\System\CurrentControlSet\Services\SharedAccess\Parameters -Name ScopeAddressBackup


ScopeAddressBackup : 10.7.0.20
PSPath             : Microsoft.PowerShell.Core\Registry::HKEY_LOCAL_MACHINE\System\CurrentControlSet\Services\SharedAccess\Parameters
PSParentPath       : Microsoft.PowerShell.Core\Registry::HKEY_LOCAL_MACHINE\System\CurrentControlSet\Services\SharedAccess
PSChildName        : Parameters
PSDrive            : HKLM
PSProvider         : Microsoft.PowerShell.Core\Registry


PS C:\Windows\system32>

After reboot the computer, ICS doesn’t work properly.
Windows 10 Internet Connection Sharing(ICS) Reboot Fix
Or after reboot, re-activate ICS manually or automatically.
Or use Powershell method instead.